
Use Our Systems for Treating Existing Mouse Issues or Proactively Protecting Your Indoor Spaces
Our System for Mouse-Free Living
Treating Existing
Mouse Issues
View instructions for treating existing mouse issues in your spaces.

Proactively Protecting Spaces From Mice
View instructions for protecting spaces from mice moving in.

Helpful Diagrams
and Video Library

Instructions to Treat Existing Short-Term or Long-Term Mice Issues
Clean → Repel → Monitor → Seal → Protect
Treating an Existing Mouse Issue

Step 1: Identify How Widespread the Mouse Activity Is
Begin by looking for signs such as droppings, gnawing, nesting materials, scratching sounds or areas where mice have been seen.
For a short-term problem, activity may be limited to one room, cupboard, garage area or other identifiable location.
For a long-term or recurring problem, inspect beyond the most obvious activity. Mice may be travelling through several rooms, storage areas, wall edges, utility spaces, garages or other enclosed areas before reaching the place where they are eventually noticed.
Understanding the extent of the activity helps determine where sachets should be placed and how much coverage will be required.
Step 2: Clean and Prepare Affected Areas
Remove clutter, food debris and other materials that may attract mice or make their activity difficult to identify. Clean floors, counters, shelves, cupboards, cabinets and other affected surfaces, following appropriate safety guidance when cleaning droppings or other signs of rodent activity.
Cleaning also helps remove scent trails and makes fresh activity easier to identify while treatment is underway.

With a localized problem, concentrate on the affected area and nearby travel routes. With a long-standing problem, consider cleaning and inspecting a wider portion of the space so activity elsewhere is not overlooked.
Step 3: Place Slow-Release Mouse Repellent Sachets
Place Rodents Away Odor Free Slow-Release Mouse Repellent Sachets along walls and other areas where mice have been observed or are likely to travel. Use approximately one sachet every 3 metres along walls. In confined spaces, use approximately one sachet per 114 L (4 cu. ft.) of spatial volume.
Sachets can also be positioned near suspected entry points or gnawed openings. Avoid immediately sealing these openings while mice may still be inside. They should have an opportunity to leave the treated area as they are repelled.
For a recent or isolated problem: Concentrate sachets around the affected area and routes leading to it.
For recurring or widespread activity: Establish broader coverage throughout the affected space, including adjacent rooms, storage areas and other locations mice may be using to travel.
The 4-Pack can be suitable for smaller or more concentrated applications, while the 6-Pack provides additional coverage for larger spaces or multiple treatment areas.
Step 4: Allow the Repellent Treatment Time to Work
Continue monitoring the area after placing the sachets. Some mouse activity near the sachets may occur during the first few days as mice investigate the repellent before leaving the area.
For an active problem, allow approximately 1–2 weeks before sealing suspected entry points.During this period, look for fresh droppings, new gnawing or other signs of continuing activity.
A short-term problem may become quiet relatively quickly. A more established problem may require additional monitoring because mice could be travelling through several parts of the structure.
If activity continues in another location, extend sachet coverage to that area rather than immediately sealing mice inside.

Step 5: Seal Openings After Mice Have Left
Once mouse activity has stopped, inspect the space for cracks, gaps and small openings that may provide access.
Rodents Away Odor Free Expandable Straw Foam can be used where appropriate to fill, seal and insulate these openings. The foam itself does not contain a mouse repellent ingredient and should be viewed as the sealing component of the Rodents Away Odor Free treatment process.
Clean the application surface, lightly mist it with water, shake the can vigorously for one minute and attach the applicator. Hold the can upside down during application and fill the opening approximately 30% to allow room for expansion.
The foam dries to the touch in approximately 10 minutes and fully cures in 12–24 hours. Once cured, it can be trimmed or sanded as needed. Exterior foam exposed to direct sunlight should be painted or stained for protection.
For long-term problems, inspect beyond the original activity area for additional openings that may also need attention.
Step 6: Reinforce the Protected Space With Sachets
Sealing openings is not necessarily the end of the treatment process. Keep Slow-Release Mouse Repellent Sachets positioned inside the protected space to provide another layer of protection.
This is particularly valuable if an opening was overlooked or a new gap develops later.
Continue using approximately one sachet every 3 metres along walls or one sachet per 114 L (4 cu. ft.) in confined spaces.

Replace sachets approximately every 3–6 months to maintain ongoing protection.
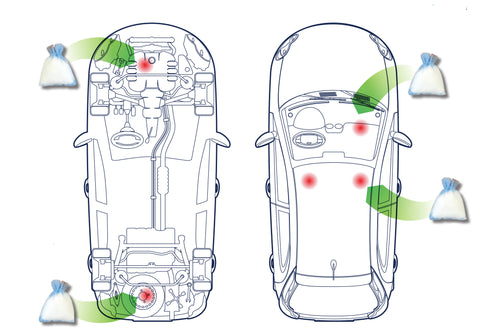
For spaces with a history of seasonal mouse activity, such as cottages, garages, storage areas, vehicles or RVs, replacing sachets before the time of year when mice normally begin looking for shelter can help transition from reactive treatment to proactive protection.
Instructions For Proactively Protecting Spaces Before Having Mice Issues
Inspect → Seal → Sachets → Maintain
Proactively Protecting Indoor Spaces
Step 1: Inspect and Prepare the Space
Inspect the space you want to protect, especially along exterior walls, cupboards, garages, storage areas, sheds, vehicles, RVs and other enclosed spaces where mice may enter or travel. Remove clutter, food debris and unnecessary materials so the area is cleaner, easier to monitor and better prepared for protection.

Step 2: Seal Suitable Openings
If there are no signs of mice currently inside the space, use Rodents Away Odor Free’s Expandable Straw Foam where appropriate to fill, seal and insulate small openings. Clean the area first, lightly mist with water, apply with the can upside down and allow room for expansion. Once cured, trim as needed and protect exterior foam from direct sunlight.
Step 3: Place Slow-Release Mouse Repellent Sachets
After the space has been prepared and suitable openings have been sealed, place Rodents Away Odor Free’s Slow-Release Mouse Repellent Sachets in areas mice may explore. Position sachets along walls, inside cupboards, closets, garages, storage spaces, vehicles and RVs, using approximately one sachet every 3 metres or one per 114 L (4 cu. ft.) in confined spaces.

Step 4: Maintain Ongoing Protection
Leave sachets in place for continued protection and check the space periodically for new gaps, damage or changing conditions. Replace sachets every 3–6 months to help maintain coverage, especially before fall or other seasons when mice begin looking for shelter. Ongoing maintenance helps support long-term protection in spaces that may be vulnerable to mouse activity.
We've Created a Growing Library of Helpful Use Case Diagrams and Videos to Support Our Customers
Helpful Diagrams and Videos

For effective use in homes, look for mouse activity and place sachets near openings through floors or walls that service appliances like sinks, fridges, and furnaces. Additionally look for and place sachets near confined spaces or gnawed openings in walls. When you are trying to get rid of mice, place sachets where there is activity and opposite from entrances, but do not block entrances. Once mice have left or if you're using our product as a preventative measure, you will want to place sachets on either side of entrances or wherever mice could gain access to the room.
Due to the allure of food, mouse activity commonly occurs in kitchens. We recommend placing a sachet under the sink area or in any cabinet where there is a hole for wiring or plumbing that could lead to a crawlspace or other spaces where mice could be gaining access. Additionally, be sure to include sachets in the pantry or wherever food is stored.




Rodents Away Odor Free is great for preventing or repelling rodent activity in many indoor settings, including office spaces. Just place sachets in corners and along walls, roughly three metres apart. For cupboards, drawers, and indoor spaces, use roughly one sachet per four cubic feet. And don’t forget around refrigerators and freezers, where food residue may linger.